
Article: Meet Cathy

Meet Cathy
A special live! Local customer Cathy joins us as we show you how she wears sariKNOTsari! We try some looks on her, and take you through what styles fit her best. Cathy is 5'7" in height, with a bra size of 34DD. Her waist is 29", hips are 41" and bust is 35". Cathy shared that she is narrow across the shoulders and that one of her legs is wider than the other so, throughout the Dress Up we focus on creating a parachute-esque figure; more narrow through the top while being wider on the bottom.
Watch Her Dress Up Below:
Shop Cathy's Collection here!
Boxy Top:
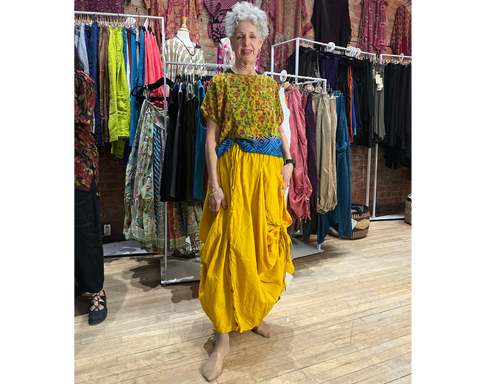
Cathy absolutely loves the Boxy Top and says that it is one of her favourite styles in the store! She looks perfect in the Casbah pants paired with the Boxy as it accentuates her natural figure while also creating the perfect figure for her height and concerns as it's a narrow top paired with wide bottoms. For some fun styling, Cathy paired the Boxy Tops she was trying on with the yellow Tashi Pants as she loved how the vibrant colour of the pants complemented the vibrant yellows in the top. While trying on the Boxy Tops, one of the first styles she tried from SariKNOTSari, she shared that her first SariKNOTSari piece was purchased from Home Hardware! We have one lovely stockist who carries our pieces at Home Hardware in Burlington! The ladies shared a laugh over Cathy’s love for this store starting in the most unlikely of places!
Side Tie Tunic:

Later in the evening, Cathy tried on the Side Tie Tunic however she wasn’t a fan of the length of the style, wanting it to be shorter on her. Shefali demonstrated how, if you can’t get the desired length by tying the small ties on the side, you can gather more fabric at the sides and tie a larger knot. This styling creates a more bunched look that eliminates some of the excess fabric and allows you more control over the length of the piece. The Side Tie Tunic pictured above was the second Side Tie that she tried on that evening, pairing it this time with our Cotton Harem Pants in plum rather than the Khaki Bamboo Capri Cathy had been rocking all night. While trying out different ways of styling the Side Tie, Priya grabbed one of our sash silks to use as a belt. Fully untying the Side Tie and wearing it at its full length, Priya ties the belt at Cathy’s waist into a beautiful bow at the back; then blouses out the fabric to create a more boho-loose look. Cathy shares that she doesn't usually style her pieces in a boho look but loved the shape this styling created!
Capelet Poncho:

The next style that Cathy tried on was the Capelet Poncho. At the beginning of the Playing Dress Up, Cathy shared that the poncho, as well as the boxy top, were two of her favourite styles from the store, going on to say that those are the styles she has at home in her closet! Cathy tried on a beautiful Poncho with a myriad of greens and the most gorgeous weaving work along the border. While the piece was turned to be the same length as our Kimono Sleeved Top, Priya styled the Poncho on Cathy by tying the corners together on one side to add weight to one side, creating a lovely asymmetrical look. The Capelet Poncho is Cathy’s favourite style because it is so versatile and effortless, and she loves being able to drop the silk by the corner and turn it into a scarf when she is on the go. It is no surprise this is Cathy’s go-to style because she looks stunning in it!
Kimono Sleeved Top:

The first style of the night that Cathy tried on was the Kimono Sleeved Top. The shade of green in the silk of the Kimono Sleeved Top (KST) paired beautifully with our new khaki bamboo capri, creating a contrasting monochromatic look! Priya, Shefali, and Cathy, (with the help of the Livestream Ladies) struck genius as they tried various styling hacks using the magnetic chained buttons. The chained buttons are an amazing tool for styling pieces as the chain creates the illusion of tucking the fabric without physically tucking the silk into your underpinnings. These types of buttons are great for trying innovative styling hacks to fit your style without having to worry about it coming undone as you go about your day! The first styling hack that Priya tried with the magnetic chained button was using two chained buttons along the bottom of the piece pinching upwards on the sleeve to create a more narrow shape. Pinching the buttons on the sleeve creates the illusion of dividing the top into three columns; the main center panel and the two flowy sleeves on each end. This one styling hack completely changes the shape and silhouette of the top!
Next, the ladies used the chained magnetic button to shorten the neckline by creating a pleat in the back (the Margo hack) to fit Cathy better as she has more narrow shoulders. While this styling looked great, we think that it could be better accomplished using our unchained buttons for a more subtle look. However, Cathy was already wearing Silver jewelry so Priya and the Livestream Ladies struck gold (or should I say silver) with a genius idea! With such gorgeous sparkling buttons, you could use just one of the magnetic chain buttons as a focal piece to pinch and shorten the garment in the front from the neckline. These versatile buttons become an accessory that pairs beautifully with jewelry that you already have at home! Priya then tried using the chained buttons to ruche the silk up from the center along the bottom and pinching it into place. Using this hack is perfect for when you want to wear your Kimono Sleeved Top while still highlighting the underpinnings you may pair with it as it shortens the length of the Kimono Sleeved Top (pictured on the far right). Because Cathy has wider hips, the shape this styling hack creates gives a narrowing effect without sacrificing the natural flow of the piece as it creates a more exaggerated flowy sleeve that is reminiscent of the gorgeous tapering in our Waterfall Top. Cathy liked the look of this styling hack and tried it once more when pairing the Kimono Sleeved Top with the cream Parachute dress, even playing around with the placement to pinch the fabric off-center for a funky look. Cathy was initially hesitant about trying on the cream parachute dress and she was worried that the light colour might wash her out because of her gray hair however; we were so glad that she tried the light colour nonetheless as she looked incredibly elegant and she loved the look!
Priya was having way too much fun trying the endless button hacks for the Kimono Sleeved Top! Before finally moving on to the next style, Priya protested that she must show everyone the wonderful hack Margo created for the Kimono Sleeved Top! Turning the Kimono Sleeved Top to the side so that it forms a long tube, Priya places one of the arm holes over Cathy's head. Then, Cathy put her arm through the head hole (Which now falls at her side). The way that the garment drapes when styled this way is very reminiscent of our Versatile Vest styling hack in which it becomes an asymmetrical top! Priya shared that if you want to take this styling to the next level, you can gather the excess fabric around the neck and tie it into a small knot, forming a flattering cowl neckline and keeping the neckline from sliding down the shoulders.
Hi Lo Top:

The next style that Cathy tried on was the Hi-Lo Top. The ladies paired a gorgeous neutral, pale-toned Hi Lo Top with the Khaki Bamboo Capri, which bolded the green hidden in the pattern, pulling it forward and brightening the piece. Priya tied small knots at the corner of the shorter part of the Hi-Lo, adding weight to the piece to narrow it as the weight eliminates some of the flowiness of the piece. While we loved the Hi-Lo Top style, Cathy had previously expressed that she doesn't tend to gravitate towards the Hi-Lo and didn't like the style for herself however; she loved the pattern of the piece and was interested in how this styling changed the drape of the piece. Cathy has more narrow shoulders and the shape of the Hi-Lo Top is quite wide, especially at the neckline as it is a low scoop neck. By adding the ties to the front as Priya did, the neckline tightens so that it doesn’t move around on Cathy as she goes about her day. Thus, despite being one of our more flowy styles that uses more of the silk garment to create, the style did not look too big or awkward on Cathy at all and the livestream ladies could not get enough of this look! Trying something new, we tried pairing the same Hi Lo Top with a cream Parachute dress. Priya takes a styling leap and puts the top on Cathy backwards with the longer ‘tail’ side to the front, she then goes on to style the piece to bring her vision to life. Priya makes small ties on the corners of the shorter side to bring the top in then, using a chained magnetic button, Priya brings up the excess fabric from the “tail” of the Hi-Lo and pinches the fabric into place once again trying the styling hack they discovered with the Kimono Sleeved Top. This styling creates a look that is very similar to the scrunchie hack we use with our Midi Kaftan, pictured above on the right.
Versatile Vest:

While Cathy was still wearing the new khaki bamboo capri and Ritzy top set, Priya wanted her to try one of the Versatile Vests that Cathy pulled as she thought the greens used in the silk garment would pair beautifully with the new bamboo colour. We found that the Vest worn with the longer side to the front added too much visual weight to her hips as that is where the most fabric falls in the piece. Shefali shared that if Cathy were to wear the vest with the longer side to the front, styling the piece with some knots and ties would help to add more shape and weight to the piece. Priya then flipped the piece so that the Vest was shortest in the front and longest in the back, and found that when worn this way, it was a much more flattering look for Cathy’s dimensions. Even the livestream ladies said that she was killing it in this look and we couldn’t agree more! Cathy also tried the Versatile Vest styled as the asymmetrical top for the first time and loved the look! This styling is accomplished by putting your head through one armhole and your arm through the other. When styled this way, one side will be shorter falling at your ribcage while the other side is long (as shown in the picture above) providing more coverage. The asymmetrical styling was just perfect for Cathy, especially because of her height. Priya played around with the styling by tying a knot to create more of a sleeve as well as add some weight to the piece to emphasize the asymmetrical look. What a wonderful look on Cathy!
Midi Kaftan:

Cathy tried the Midi Kaftan for the first time with our Khaki Bamboo Capri Pants and was going in with some initial hesitancy that the style would be too much fabric for her and she would be lost in the piece. At first, Cathy’s initial feelings came to fruition however, through Shefali and Priya’s styling, Cathy came to see all the fun ways one could style the Midi Kaftan. To eliminate some of the excess fabric, Shefali styled the kaftan by gathering the excess fabric and tying it into a large knot to add weight to the piece and create a more asymmetrical shape and drape. To try and counter feeling lost in the garment, Priya brought out some chained magnetic buttons to attempt a styling hack to bring in the piece along the side. Priya connected a set of chained buttons on either side of the kaftan below the arm. This narrows the piece as the chain brings in the fabric creating a more cinched look without the restriction of a belt or tie, a perfect alternative as Cathy shared she finds belts become uncomfortable throughout the day. Priya found the magnets could be used to create a similar pleat to the one sewn in the back of our Self Pocket Dress to bring it in in the front of the Midi Kaftan to create a beautiful shape that narrows the piece while making it more interesting visually. While playing around, the ladies used the chained magnetic button to weigh down the fabric, creating a deeper v-neckline and also making the shoulders narrower. By using the buttons in this way, you can get the full effect of the Midi Kaftan while achieving a more narrow fit in the shoulders. Throughout trying these styling hacks, we just loved the Midi Kaftan on Cathy as each look was very ethereal on her! Finally, Cathy tried pairing the Midi Kaftan over a cream Parachute dress, an underpinning that is one of her favourites. Cathy and Priya used the magnetic chained buttons to cinch the fabric on both sides in the front of the kaftan to create the illusion of a Hi-Lo Top with beautiful dramatic sleeves. Although the Midi Kaftan may not be the style for her, Cathy loved the different ways the buttons could be used to style the piece to fit her style more.
One Shoulder Dress:

We were very interested to see this piece on Cathy as the One Shoulder Dress has a very wide neckline and is one of the styles that most of our customers with narrow shoulders tend to stay away from despite being such a flattering piece! One of our customers, Denise, shared that when she wears the One Shoulder Dress, she uses a pair of our magnetic buttons to tighten the neckline so that it doesn’t slip off her shoulders and she can still enjoy the beautiful cut and patterns. Cathy Tried on the One Shoulder Dress pictured above and fell in love with the piece! The gorgeous rustic One Shoulder Dress was covered in detailed embroidery and sparkle that was just stunning! Immediately upon putting it on, Cathy and Priya weren't impressed by the neckline and wanted to do something to the piece so that it sat in a more flattering way on Cathy. Priya gathered some fabric on the shoulder with the open arm and tied a knot to shorten the neckline. As mentioned at the beginning of the Playing Dress Up, Cathy has quite narrow shoulders so pieces with a wide neckline can sometimes fall awkwardly. Once the neckline was tied, the One Shoulder looked gorgeous on Cathy! The livestream ladies shared that they never wear their One Shoulder Dresses without their magnetic buttons as it helps create the perfect shape! To take the styling even further, Priya showed how you can tuck the One Shoulder Dress at the hip into your pants waistband or your camisole to create more of a tunic look or add some asymmetry!
Boxy Babydoll Dress:

When approaching the Boxy Babydoll style, Cathy shared that she loves the look of the style but finds that it is one of the few pieces she doesn’t love for herself. Trying out the style, the ladies paired a gorgeous warm purple floral sheer Boxy Babydoll Dress over mustard yellow Tashi pants to create the fun and vibrant look Cathy loves! Priya found that some styling was needed to make a more flattering shape for Cathy as the pieces paired together have a lot of flowing fabric in which someone who is a bit narrower may get lost. Using our regular magnetic buttons, Priya ‘pinned’ up the corner of the skirt of the Boxy Babydoll Dress, creating a small ruched drape to add a focal point as well as more shape to the piece. This hack helped show off the underpinning which helped eliminate the look of getting lost in the fabric. After seeing the dress styled this way, Cathy shared that she liked the look of the Boxy Babydoll Dress over top of something and would like to try the style over her tiered skirts to see how she could incorporate the dress into her closet. Throughout the night we noticed how the right silks are so important for achieving a certain look or feeling more confident in these styles. So, Priya picked out another Babydoll Dress for Cathy to try on that was made out of crepe silk, meaning it was not sheer like the purple dress she had tried before. This dress was a gorgeous mix of blues with golden-yellow flowers spread throughout the pattern. Cathy once again paired this dress with the yellow Tashi to tie into the colour of the flowers. This time, Priya styled the Boxy Babydoll by using the magnetic button to ‘pin’ the silk up through the pocket of the dress so that the button is hidden. We loved the look on her! Cathy can rock the Boxy Babydoll despite being a style she was hesitant about!
Self-Pocket Dress:

Cathy tried on a gorgeous primary-coloured Self Pocket Dress made up of panelled sections in different prints, with a silhouette of wildflowers growing up the front of the dress unfortunately not pictured. Priya fell in love with the Lorina magnet hack and wanted to try it with different silks in the store! Priya used the magnetic chained buttons to once again cinch the silk upwards and ‘pin’ it in place to create a beautiful drape that also highlights the cream Parachute Dress paired underneath the Self Pocket. The Self Pocket Dress was a stunning combination with the Parachute Dress even without the chained button as it complements the asymmetrical cut of the skirt without taking away from the shape it creates. We loved the cream colour however, we think that this Self Pocket Dress in particular looked incredible with a black dress paired underneath to emphasize the colours in the print. Later in the live, Cathy tried a different Self Pocket dress that was a beautiful denim blue with small golden patches in the pattern that were covered in pink and blue watercolour flowers (pictured above). Cathy loved the golden patches so much that she wanted to bring attention to them by pairing the dress with the mustard yellow Tashi pants, complementing the look with the mustard fabric-wrapped necklace. This look beautifully highlighted Cathy’s incredible eye for colour! This look is this writer’s favourite look of the night as the colours are so beautifully vibrant as is Cathy!
Sculptural Tunic Dress:

While looking for different pairings to go with the vibrant Vireo Casbah pants, Priya suggested Cathy try on a gorgeous brilliant blue Sculptural Tunic Dress with a floral pattern made of deep blues and bright greens. Cathy loved the pairing exclaiming that they were her colours! She loved the vibrancy of the dress and ended up taking this fabulous look home! Priya shared that the Sculptural Tunic Dress is one of her favourite styles because it is such a flattering piece! The tunic dress is perfect for pear-shaped bodies because of its beautifully cut skirt that creates a lovely drape as well as leaves lots of room for the hips.
Earlier in the evening, the ladies were talking about how necklines are an important aspect of styling a piece as they can completely change how a piece looks on you. The Sculptural Tunic Dress has a wider neckline thus the neckline of the underpinnings you pair with it may show at the top like Cathy’s black underpinnings she wore to her Playing Dress Up appointment (she knew the drill!). Priya showed a quick hack to cover the underpinnings if you’d like or adjust the piece to control how much is shown, creating a more clean look. Using a magnetic button, Priya created a pleat in the back, very reminiscent of the back pleat in our Self-Pocket Dresses, to create a more narrow neckline that seamlessly covers the neckline of the underpinning. This hack is helpful for those with more narrow shoulders as well as helps create a more clean look by eliminating visual weight at the neckline.
Maxi Dress:

The last style of the night was a beautiful green, blue, and burnt red Maxi Dress with a matching Shrug. Before putting on the dress, Shefali shared that Cathy should wear it with the ‘armpit side’ to the front which can provide more support and comfort for those with a larger bust. Moreover, turning this dress so the 'armpit side' is to the front also puts the shortest side of the Maxi Dress to the front which is helpful for those who may be a bit shorter as it eliminates the risk of tripping! The Shrug and Maxi Dress are a perfect set for any occasion however the Shrug is a style that can be a bit tricky for those who are narrow in the shoulders as it is cut quite wide and can slip off the shoulders. To counter this, Shefali shows styling hacks to be able to wear this beautiful set comfortably without worrying about the shrug sliding. The first styling of this set was to turn the Shrug into sleeves under the Maxi Dress: Cathy put the Shrug on first, then put the Maxi Dress on overtop tied halter style, finally, Shefali did some minor adjustments to secure the placement of the Shrug underneath with the straps of the dress. This styling showed off the gorgeous Maxi Dress while creating Kimono Sleeves out of the shrug; a perfect styling if you want more arm coverage in your evening look! The second style of this set was to wear the Maxi Dress as the base and wear the Shrug over top. Then, Shefali went in and tied one large knot on the interior of each shrug sleeve to make the opening more taut which prevented it from sliding while making the sleeves of the Shrug less dramatic. The final styling hack of the night was wearing the Shrug as an asymmetrical poncho. By putting your head through one armhole and your arm through the other, Priya and Shefali created a gorgeous cross-body poncho that provides arm coverage while creating a beautiful and graceful look (pictured above).

Leave a comment
This site is protected by reCAPTCHA and the Google Privacy Policy and Terms of Service apply.